Question: How to setup Recurring Membership app?
Solution:
Watch Quick Video below to Setup the App
Follow the below steps to install and set up the Recurring Membership app:-
This guide will show you how to set up a membership app in your Shopify storefront, create recurring membership plans, and set up on the store. Follow the steps below to get started.
Step 1 – Open App Dashboard
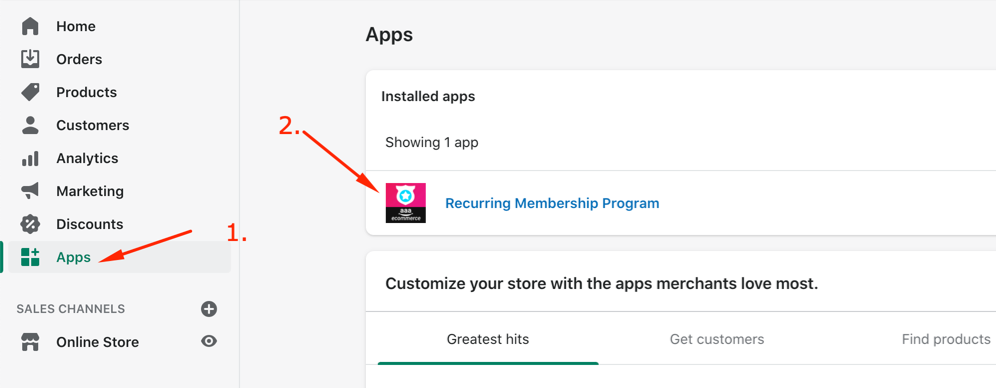
Log in to your Shopify store from the left sidebar, find Apps click on it
Click on the Recurring Membership app:
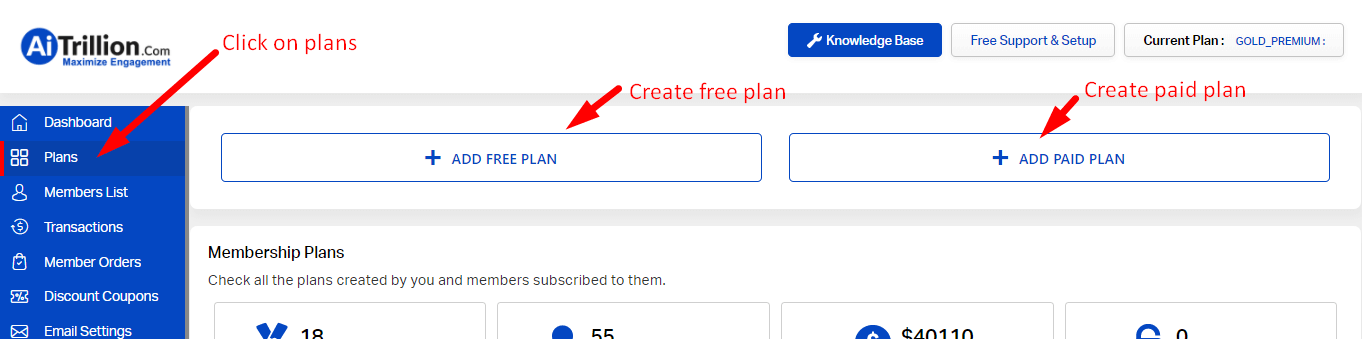
2. You can see the dashboard of the app and click on Plans.
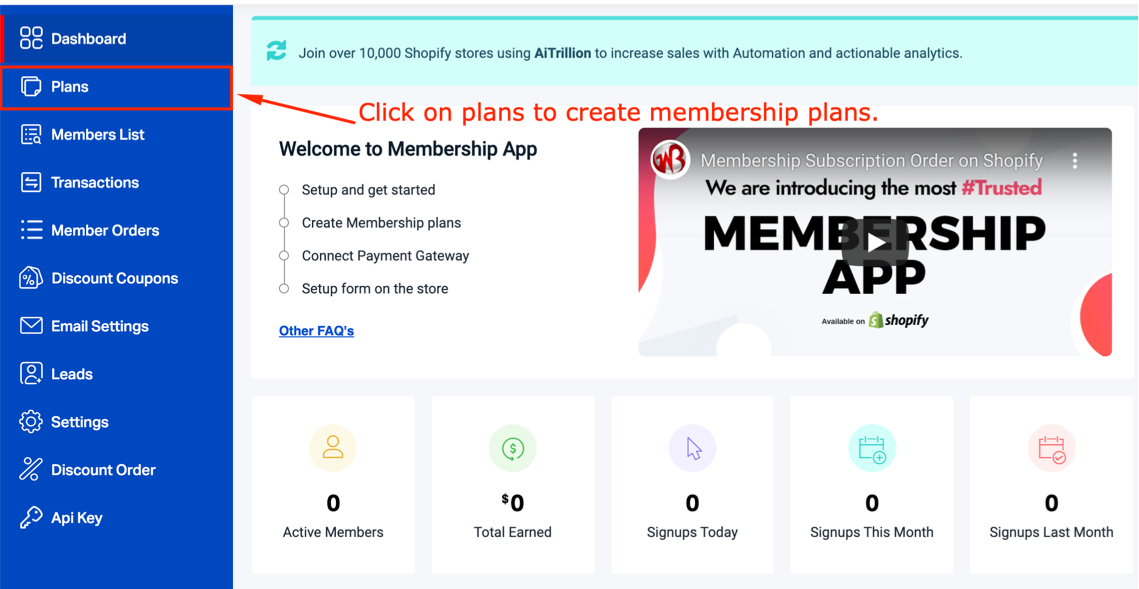
3. From here, you can create membership plans.
- FREE PLAN – Create this for free membership registrations.
- PAID PLAN – Create this for either Recurring or One-time membership registrations.
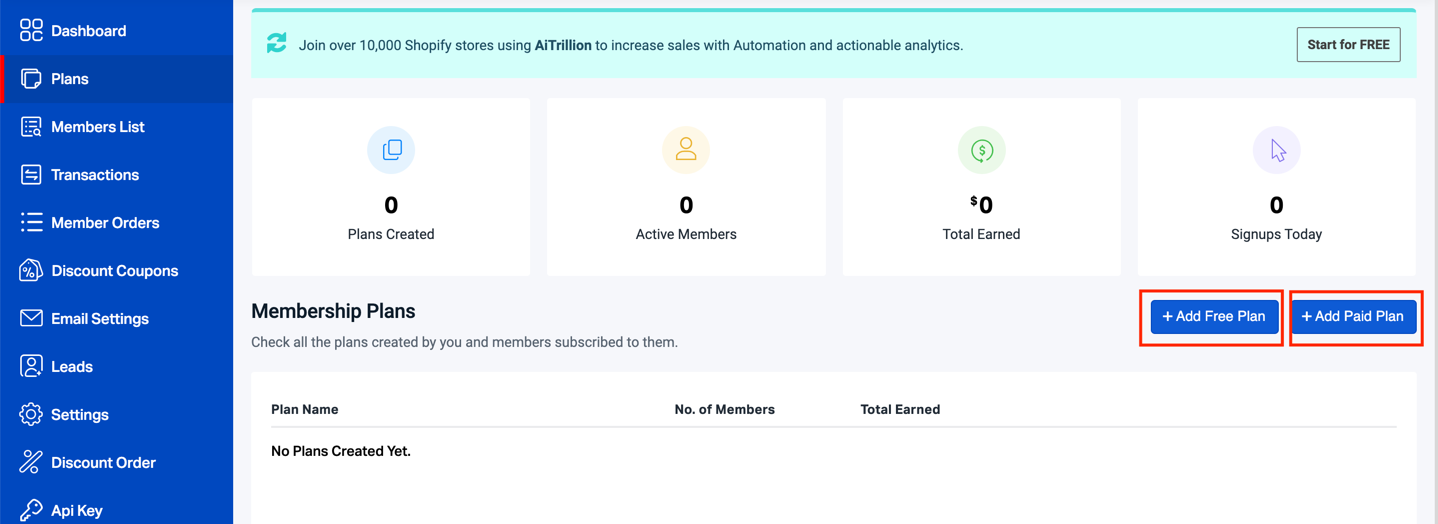
Step 2 – Create a Free or Paid Plan
Create a Free or Paid subscription plan
Step 2(a)
Create a free plan and additional details below
 Step 2(b)
Create Paid Recurring Plan
First, connect your payment gateway. Goto Settings > Connect Payment Gateway
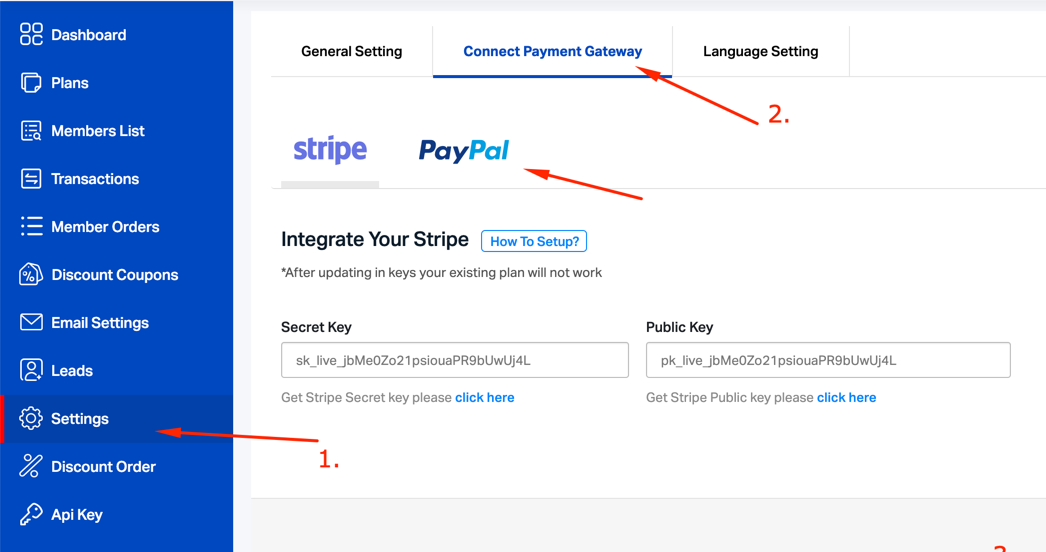
Refer to this article to learn more about How to Connect PayPal Payment Gateway
Refer to this article to learn more about How to Connect Stripe Payment Gateway
Now go to Plans > Add Paid Plan

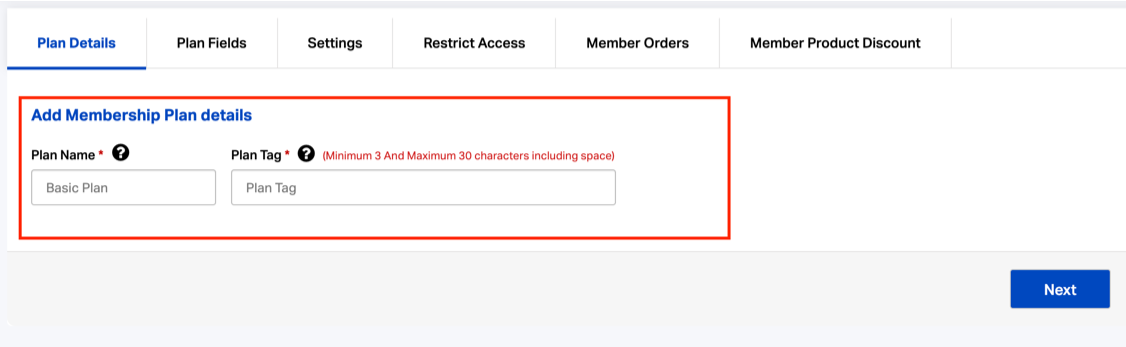
Then add other plan details
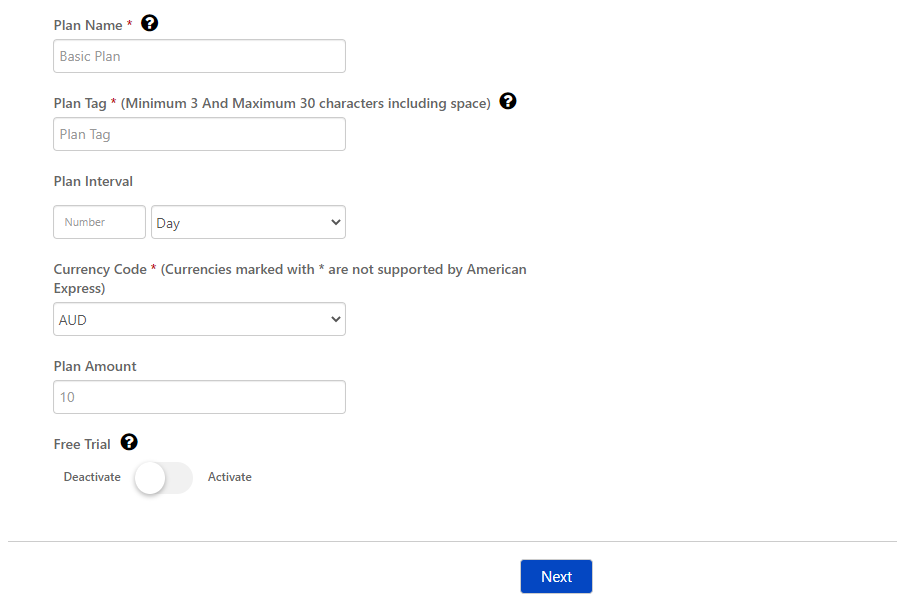
Plan Name: Your plan name for internal use.
Plan Tag: It will get assigned to the Shopify customer who will subscribe to any particular plan.
Plan Interval: A membership plan of a particular time interval will be created.
Currency code: The currency code of the plan amount can be added.
Plan Amount: The amount for membership can be added here.
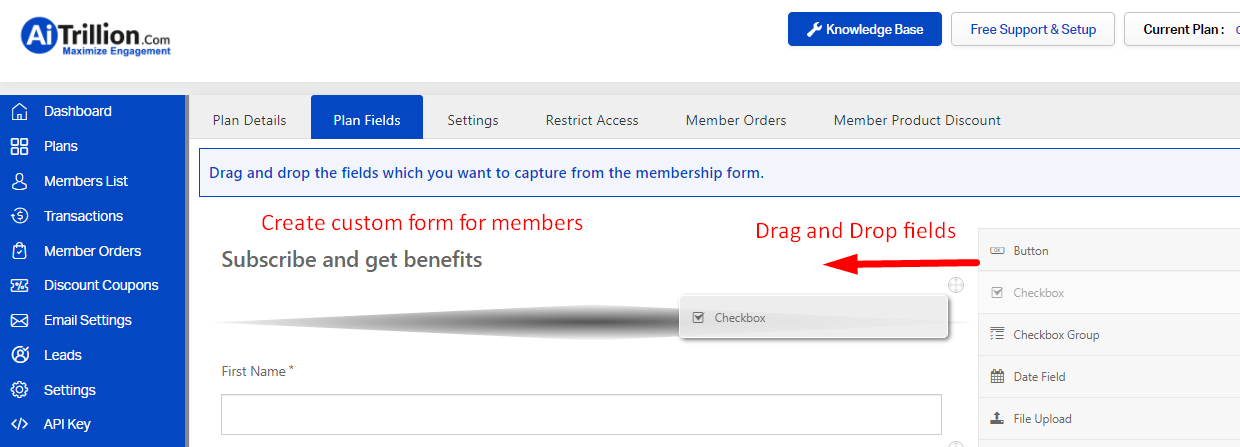
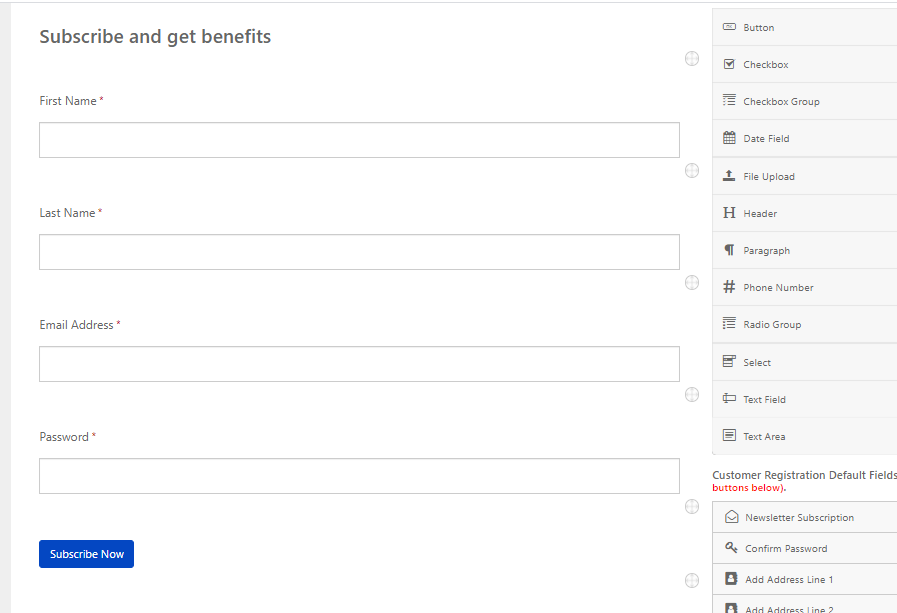
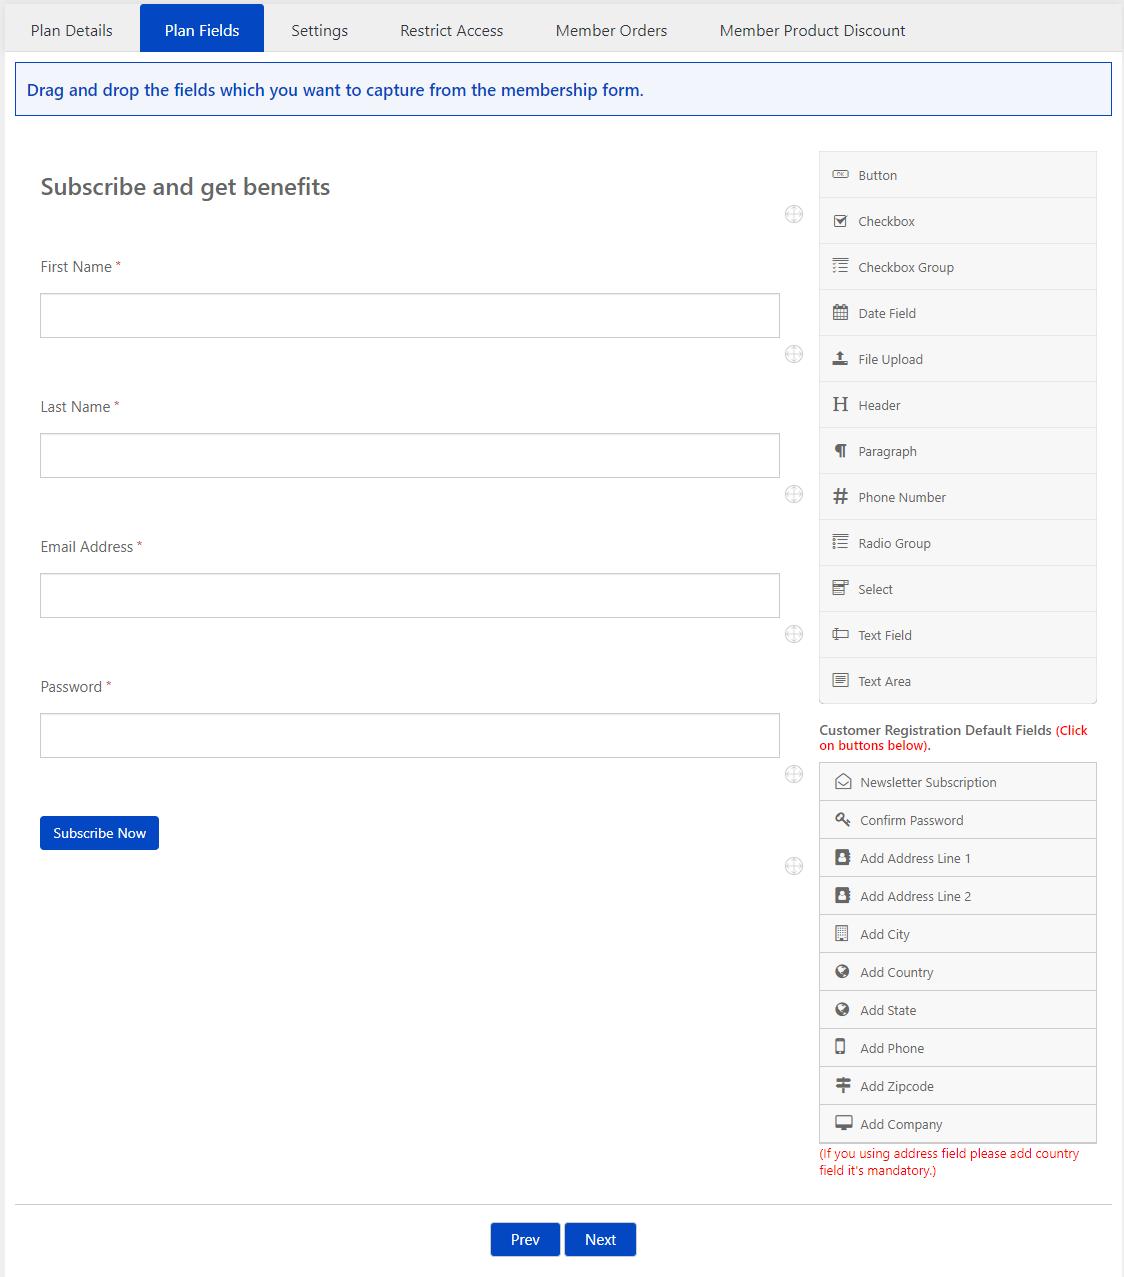
Step 3 – Setup form fields
Create a custom form for the members to capture the required details from customers when they sign up for membership. Use drag and drop form builder.
Here, First Name, Last Name, Email Address, and Password are Shopify mandatory fields for creating a customer so these can’t be removed or deleted. You can add other required fields in the form that needs to be filled by customers in the form while subscription.
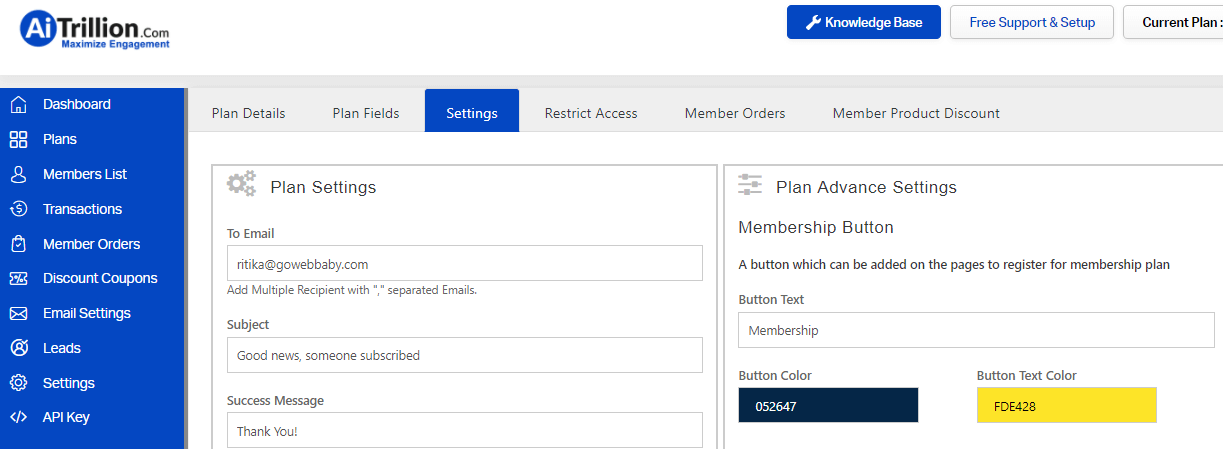
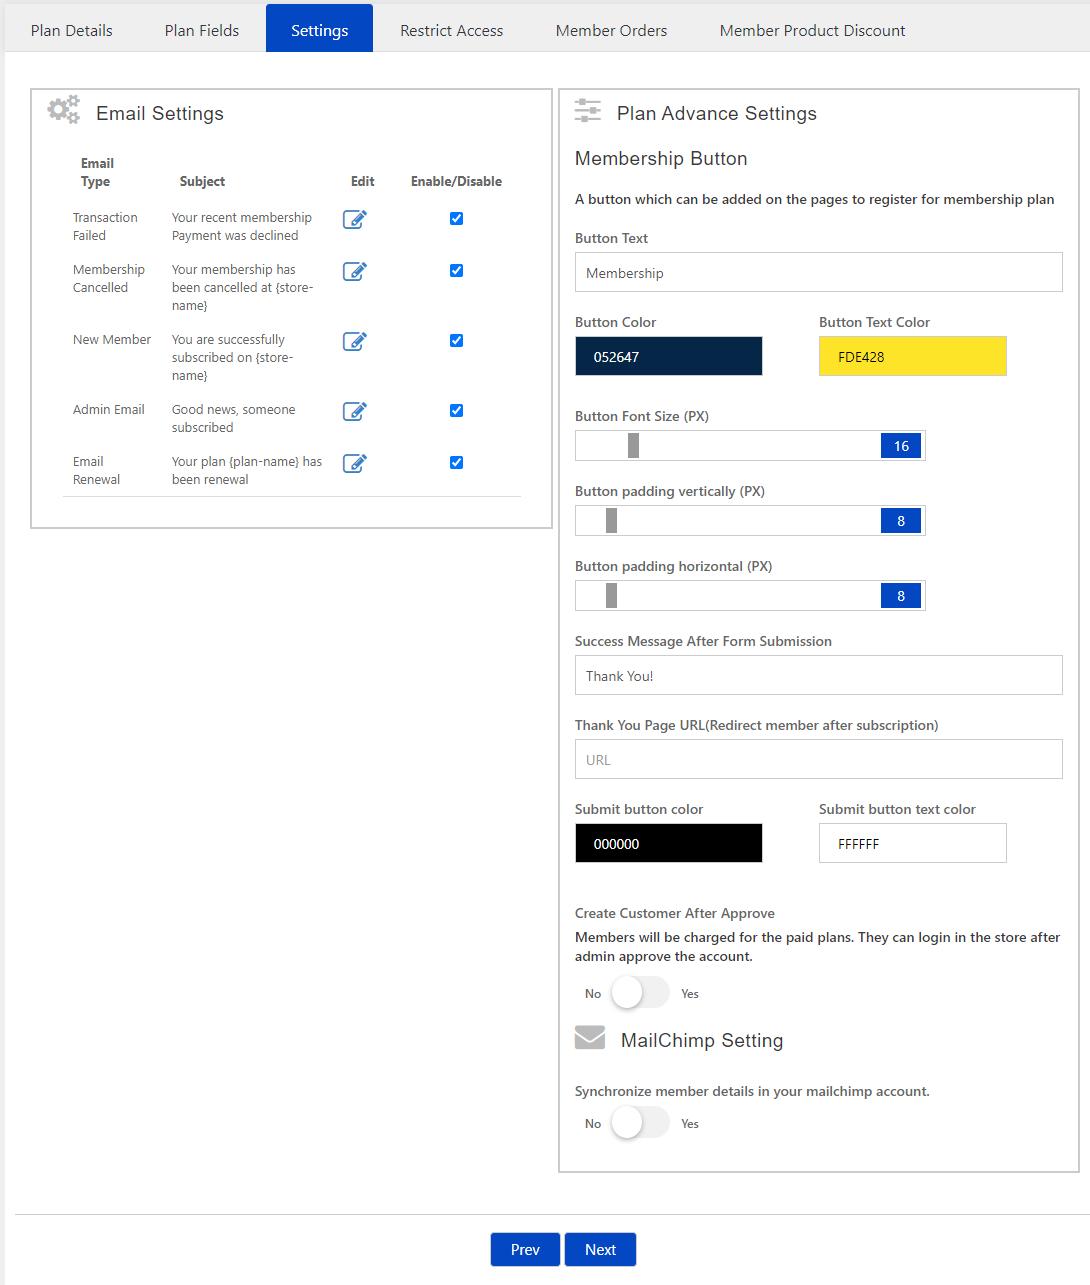
Step 4 – Advance settings
Advanced design settings for the form Customize and design the settings of form and membership buttons from here. You can also integrate the plan with MailChimp.
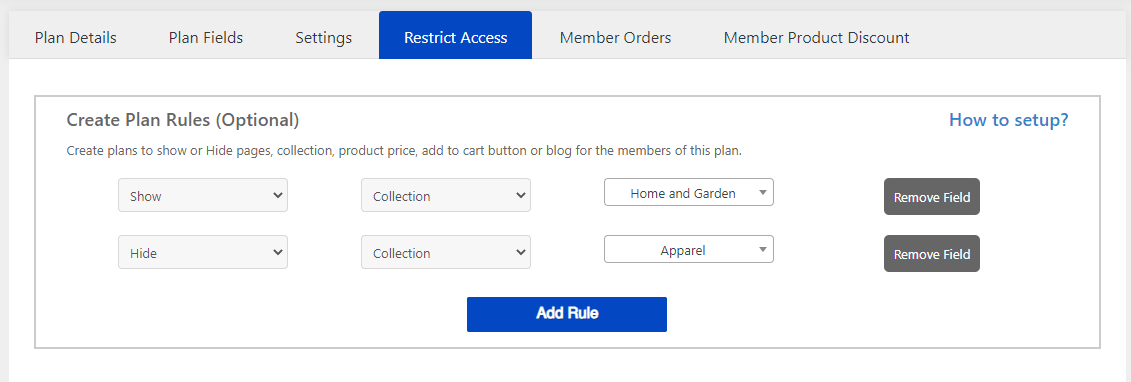
Step 5 – Show/Hide pages, collection to members
Restricted Access: Show or hide specific collection, pages, add to cart button, price, and blog to specific subscribed members only. All rules you create will be applied to only the subscribed members of this plan only.
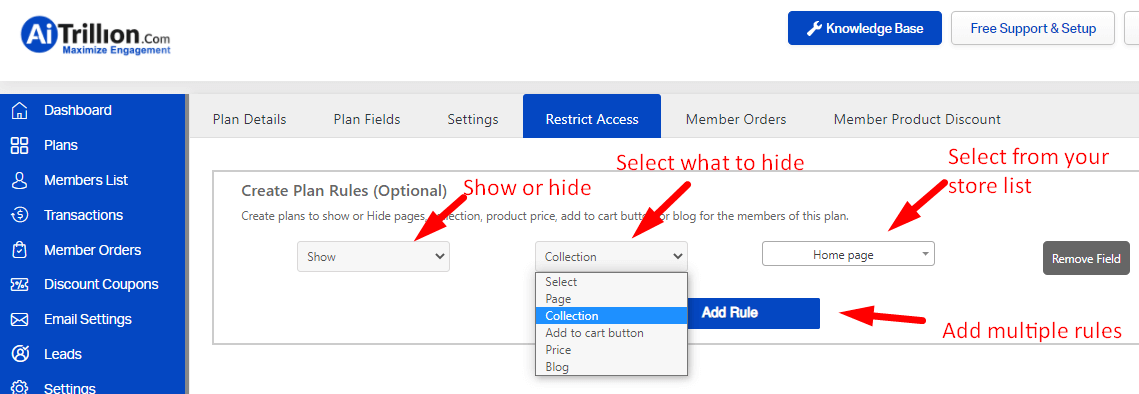
Refer to this article to learn more about how to set up a restricted page?
Refer to this article to learn more about how to set up restrictions on the Product Price and the Add to Cart button?
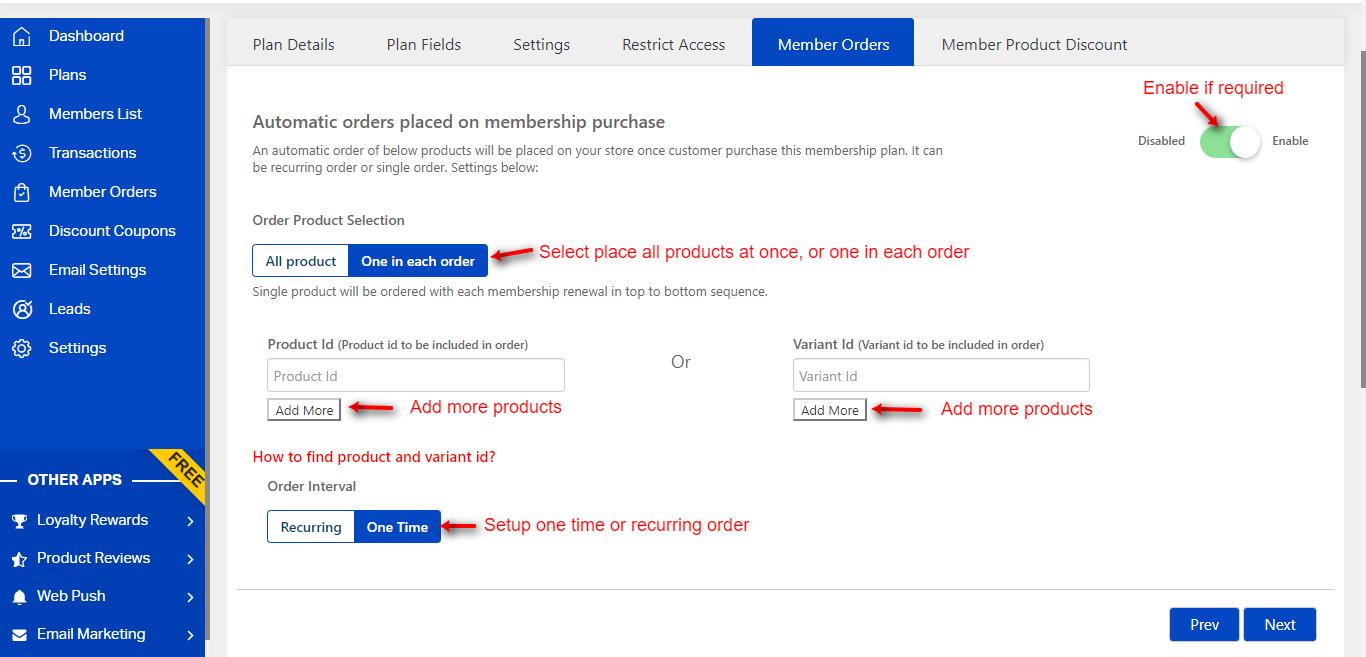
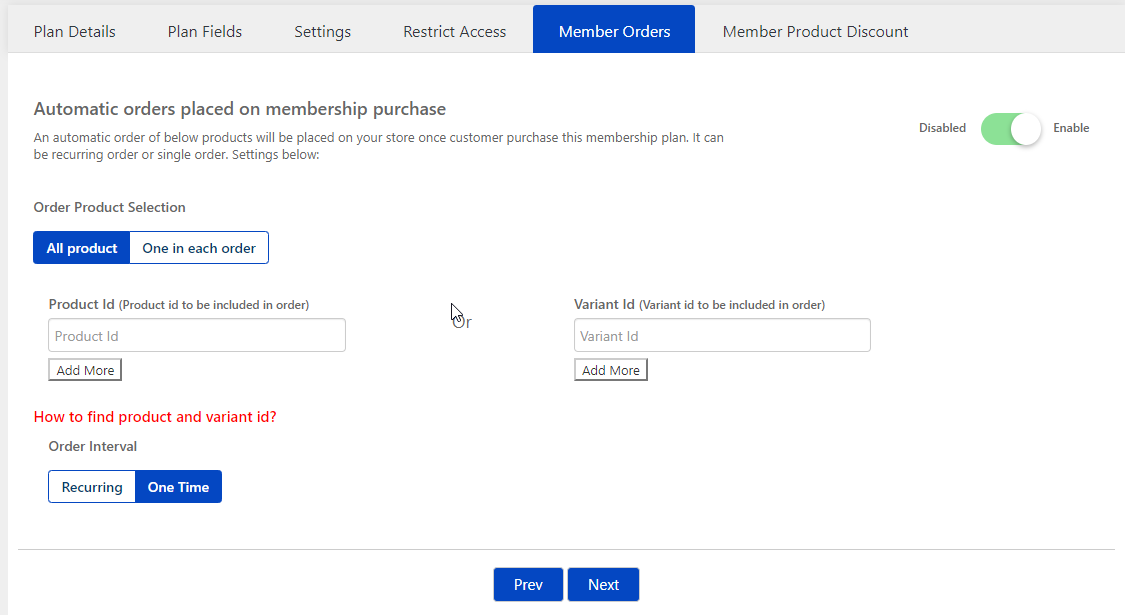
Step 6 – Recurring members order
Members Order: Select products to be ordered on every membership renewal. It can be a recurring order or single order.
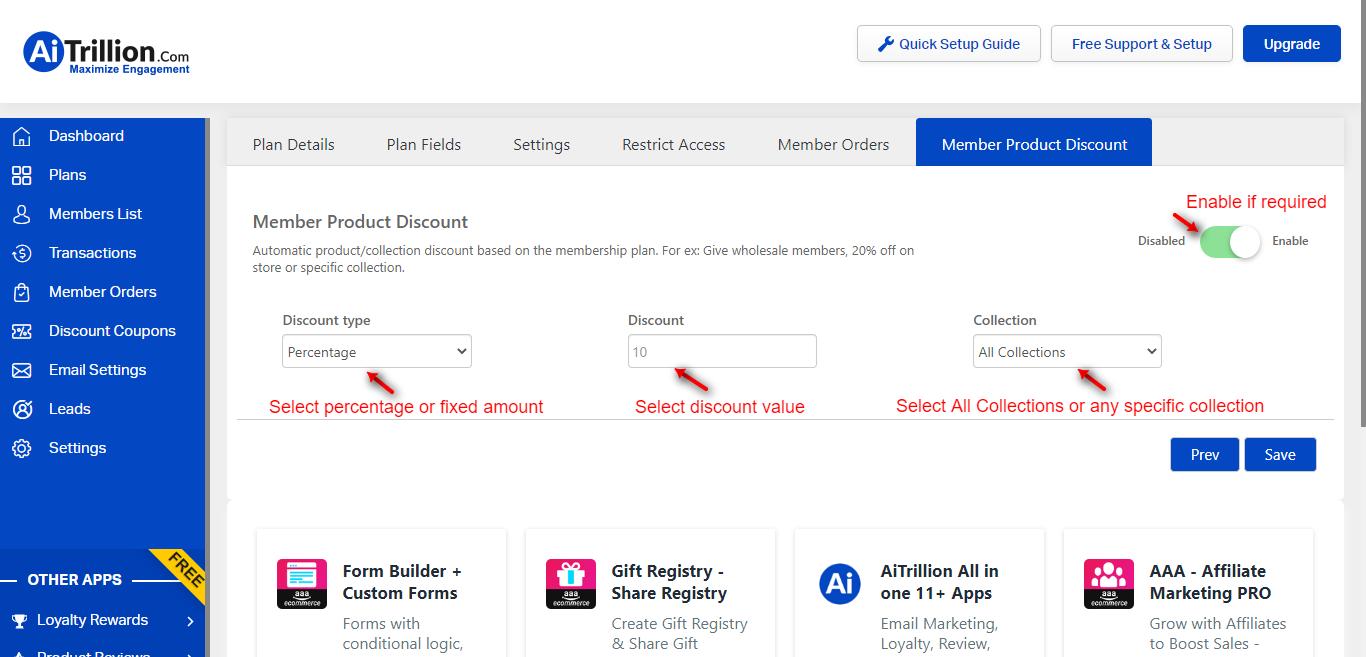
Step 7 – Members product Discount
Members Product Discount: Setup a collection-wise discount for the members of the store. For example: Give Wholesale members 20% off on selected collections.
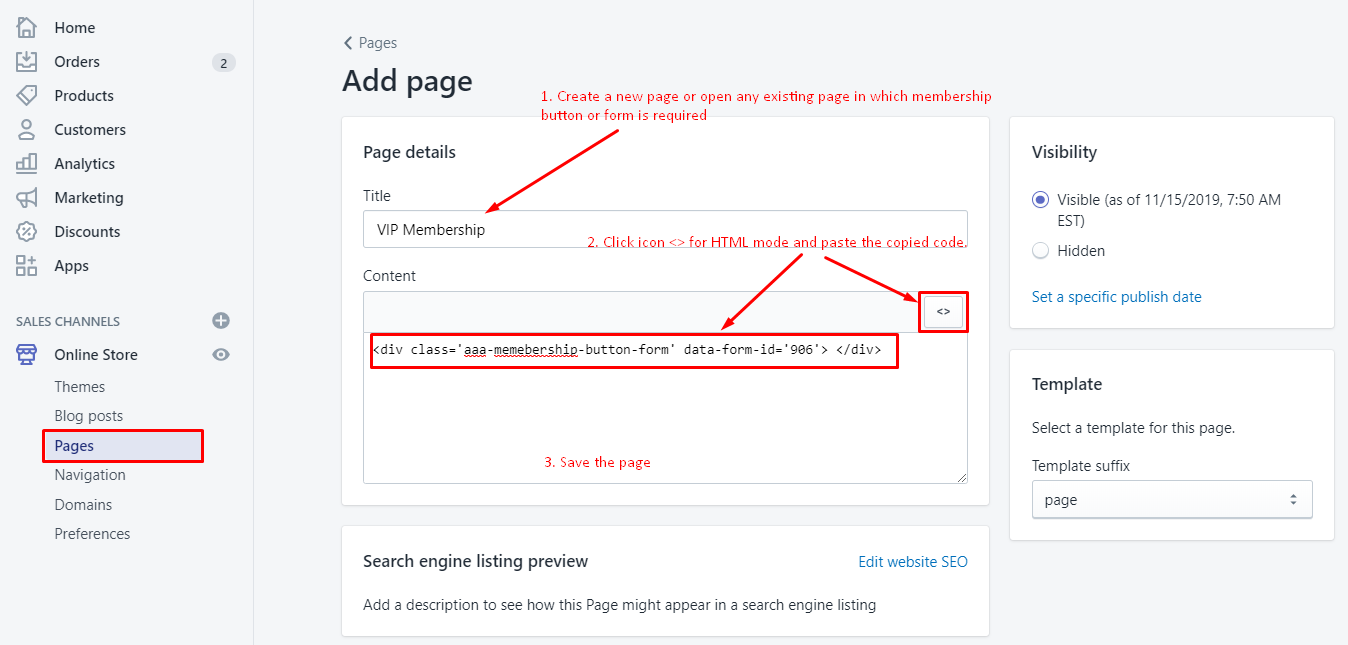
Step 8 – Embed code for the membership form
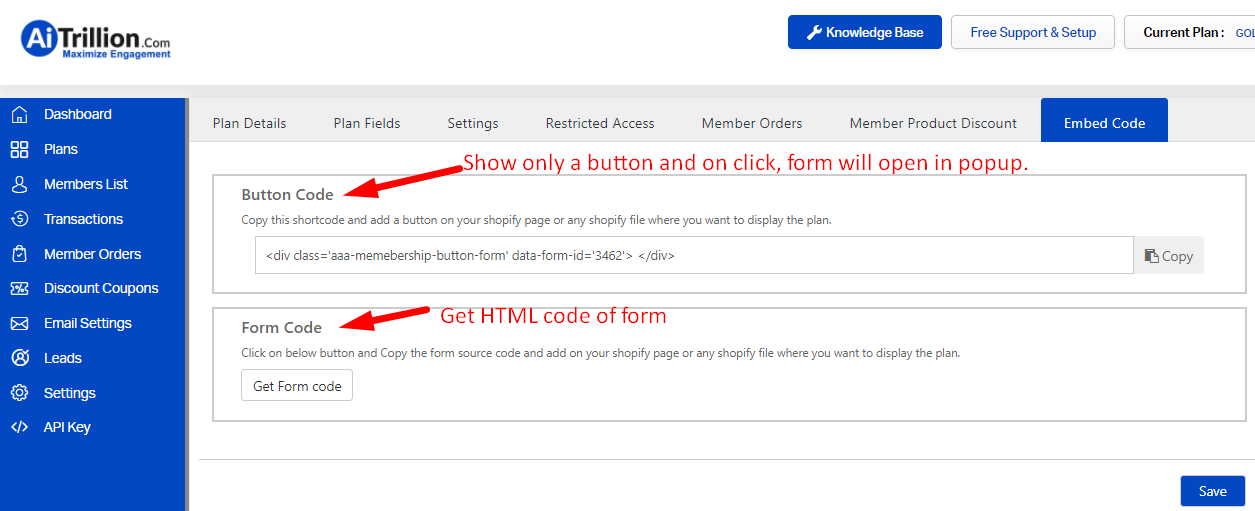
Embed Code: Once you save the above details, you will see this embed code field. You need to add this shortcode on the member page on Shopify editor mode.
Button Code: Use this code, if you just need a button on your page and on click, it will open the form in a popup.
Form Code: Use this code, if you want to show a direct form on a page, and also you can edit the HTML version for the designing purpose.
Log in to the Shopify store and go to Apps > AAA Membership Subscription and create a plan accordingly.
Choose from the below plans and proceed to create according to your requirements.
- FREE PLAN – It can be created for free membership registrations.
- PAID PLAN – Recurring and One time (Stripe account details are mandatory to accept payments)
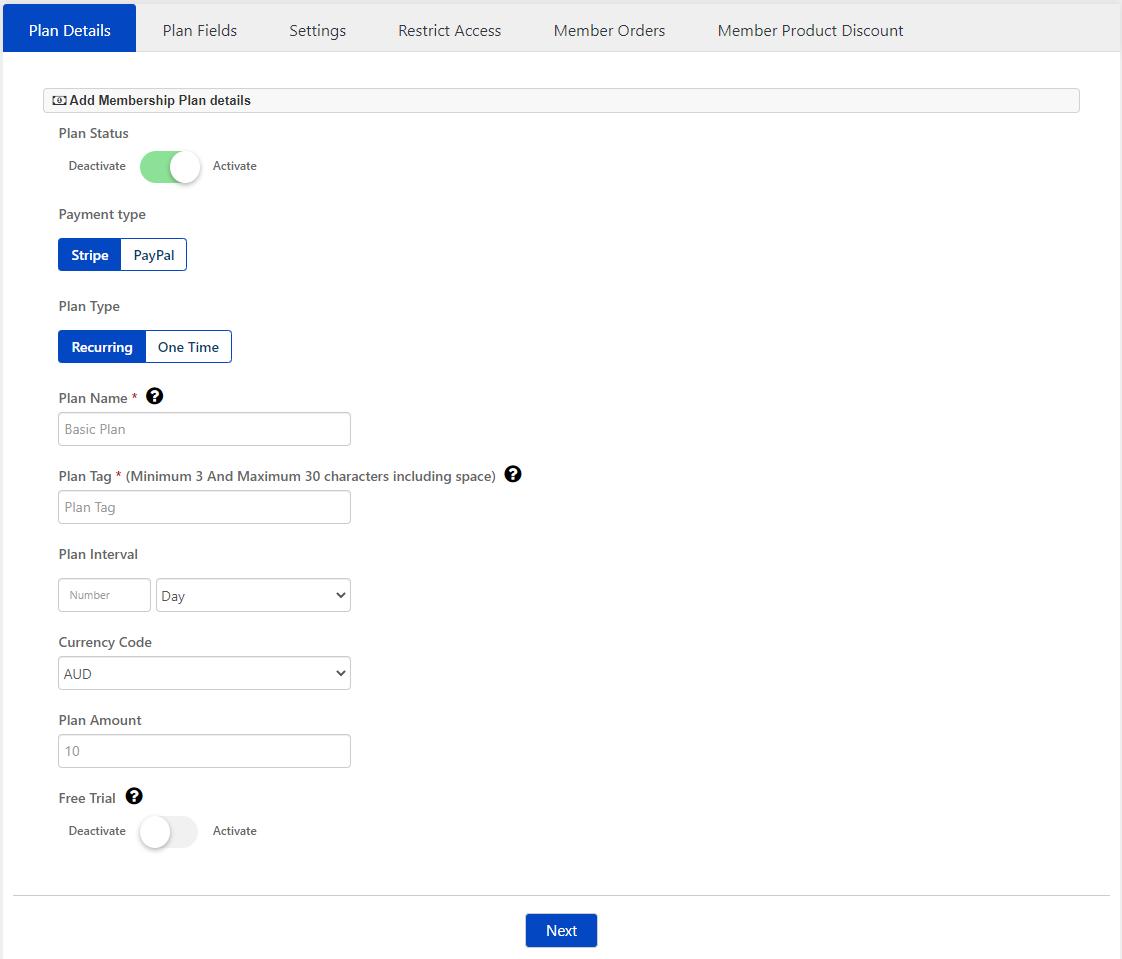
Step 1. Add plan details, includes
Plan Status: (Active or Deactivate)
Payment type: (Stripe or PayPal) for paid plans only
Plan Type: (Recurring or One Time)
Plan Name: Membership name for internal use.
Plan Tag: It will get assigned to the Shopify customer who will subscribe to any particular plan.
Plan Interval: A membership plan of a particular time interval will be created.
Currency code: The currency code of the plan amount can be added.
Plan Amount: The amount for the membership plan can be added here.
Free Trial: Add a trial period in your plan for your members
 Step 2. Add plan Fields: First Name, Last Name, Email Address, and Password are Shopify mandatory fields for creating a customer that can’t be removed. You can add many other fields in the form as per your requirements which your members need to fill in the form.
 Step 3. Update Settings: Customize the Email Settings and Membership Button as per your requirements from here. You can also integrate the plan with MailChimp.
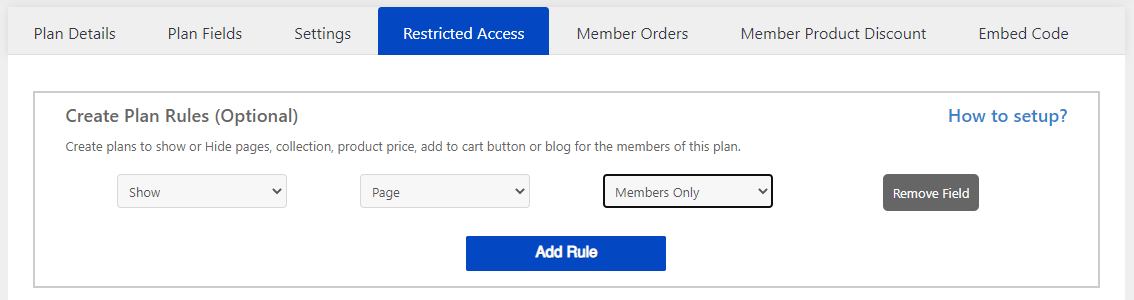
Step 4. Create Plan Rules: Create plans to show or Hide pages, collection, product price, add to cart button or blog for the members of this plan.
> Working criteria –
If you want to hide any collection from all customers except current plan members then add a condition like
Show → Collection → Choose collections
If you want to show any collection to all customers except current plan members then add a condition like
Hide → Collection → Choose collections
 Step 5. Member orders: Automatic orders of a few products can be placed, once the customer subscribes to a specific membership. Orders can be recurring or one-time.
Step 6. Member Product Discount: Automatic product/collection discount based on the membership plan. For example: Give wholesale members, 20% off on store or specific collection.
NOTE – This step can be skipped as the code is automatically injected after the app installation to your theme. You can just review the code inserted in your theme.
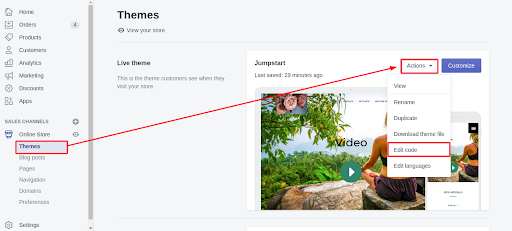
Step 1. From Shopify Admin, go to the Online Store > Themes > Actions (Published Theme) > Edit Code (Published Theme).
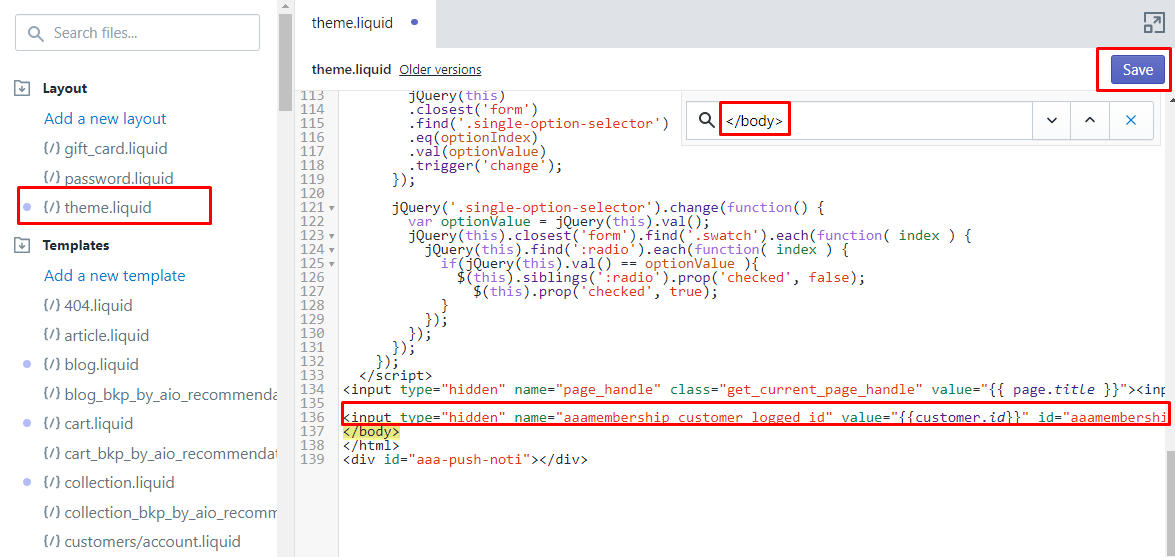
Step 2. Open theme.liquid file under Layouts and check if the below code is available in the theme.liquid file before </body> tag. If not, then add it.
<input type="hidden" name="aaamembership_customer_logged_id" value="{{customer.id}}" id="aaamembership_customer_logged_id">
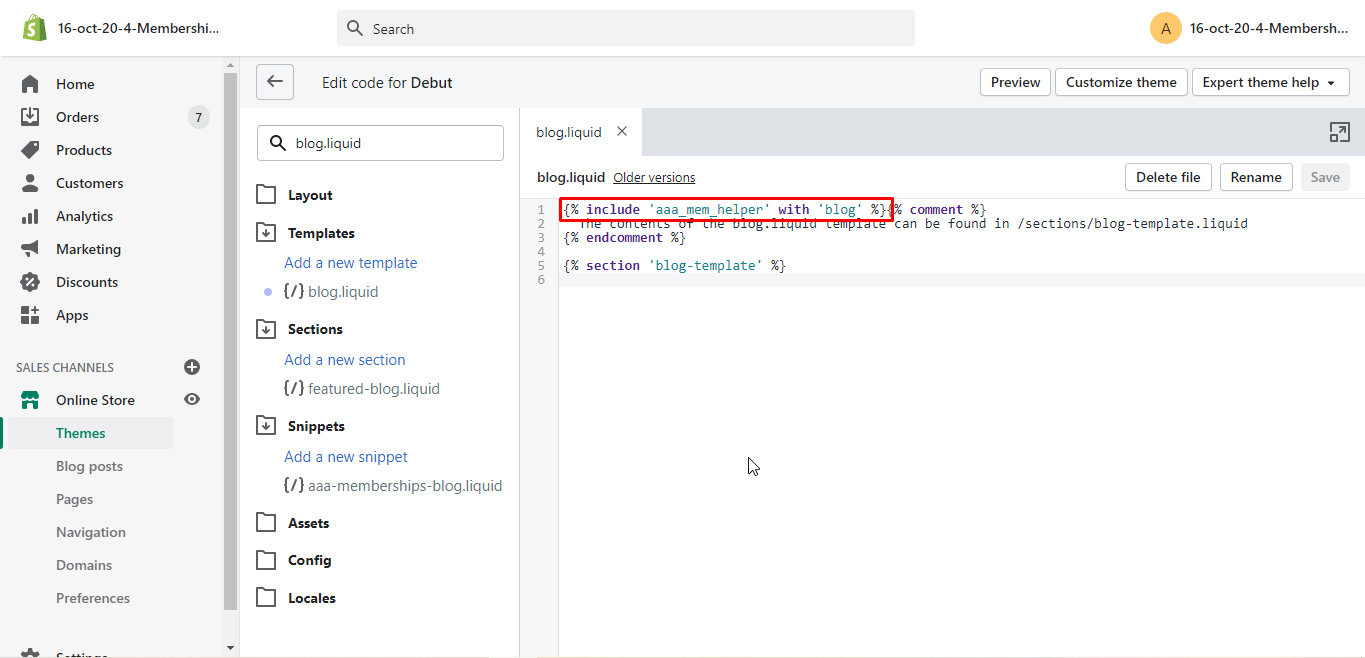
Step 3. Open blog.liquid under Templates and paste below code at the top of the file. Ignore this step if code is auto-injected or already available.
{% include 'aaa_mem_helper' with 'blog' %}
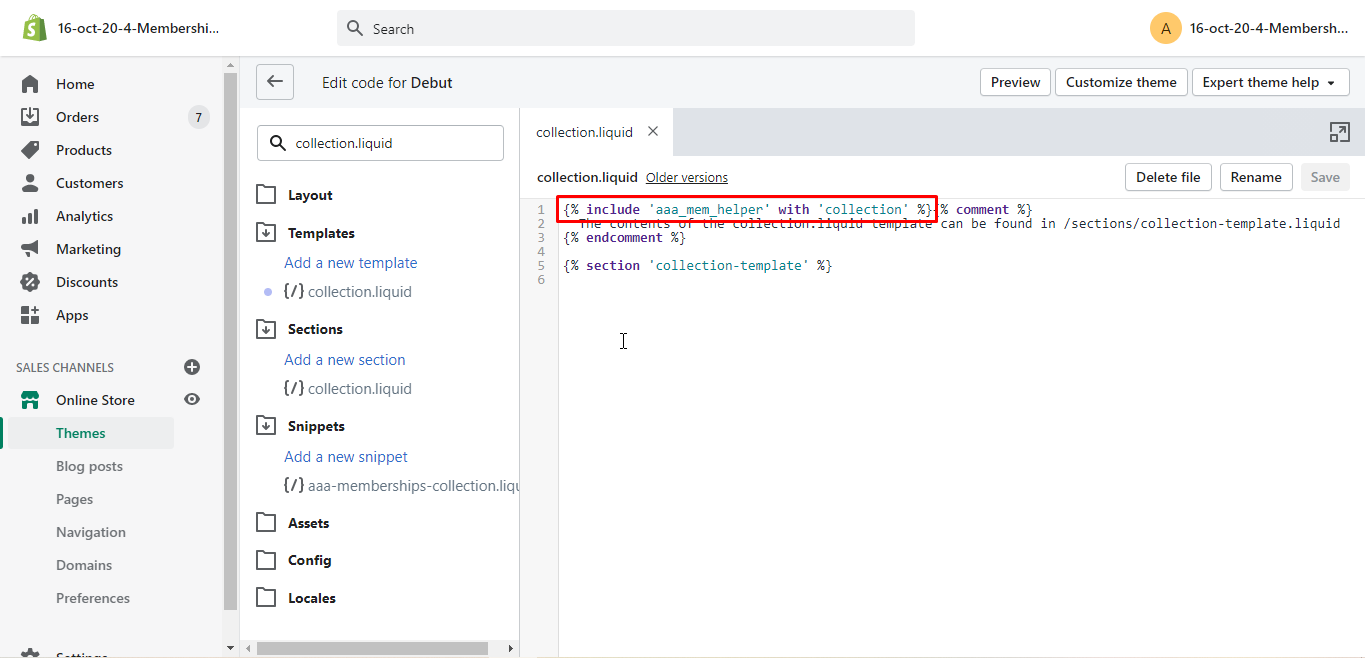
Step 4. Open collection.liquid file under Templates and paste below code at the top of the file. Ignore this step if code is auto-injected or already available.
{% include 'aaa_mem_helper' with 'collection' %}
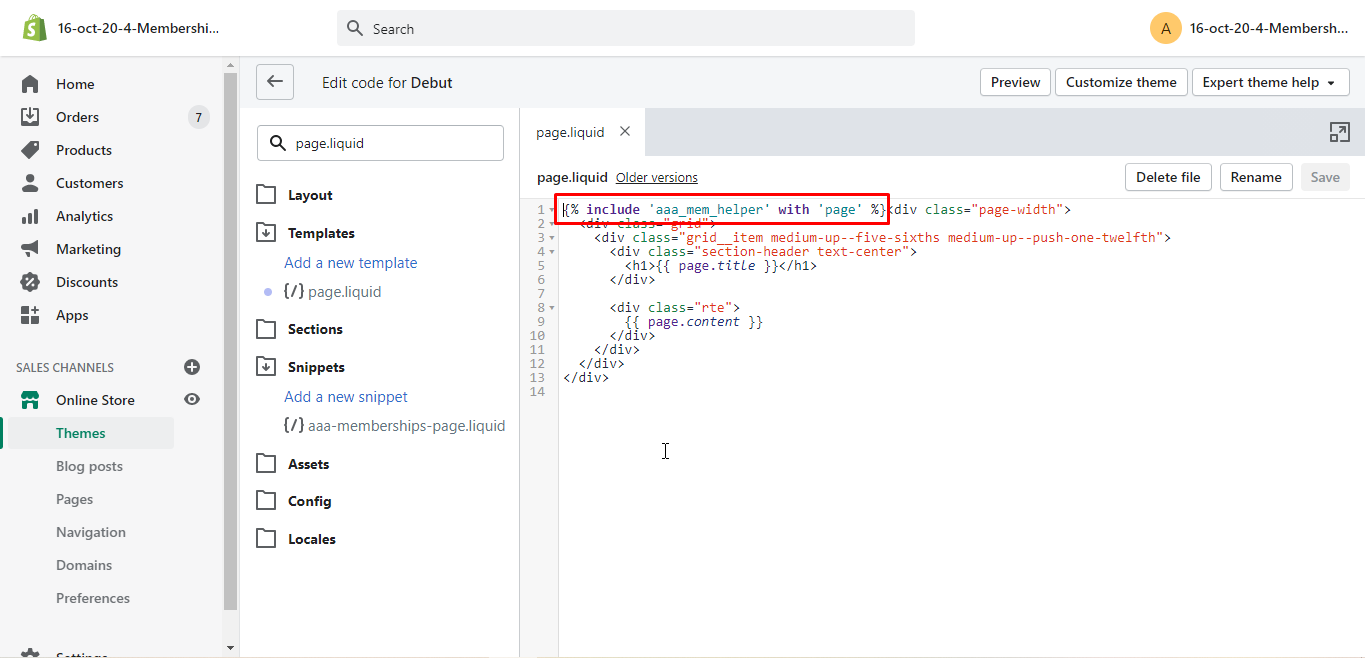
Step 5. Open page.liquid under Templates and paste below code at the top of the file. Ignore this step if code is auto-injected or already available.
{% include 'aaa_mem_helper' with 'page' %}
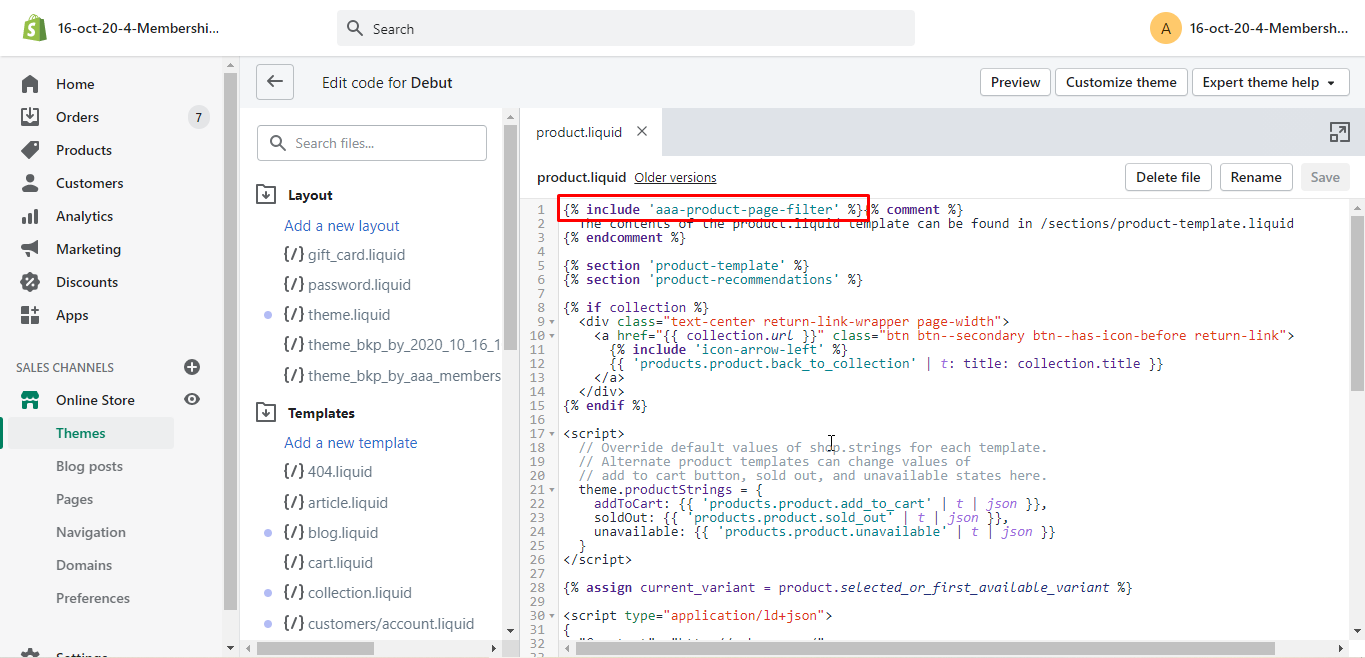
Step 6. Open product.liquid file under Templates and paste this code at the top of the page. Ignore this step if code is auto-injected or already available.
{% include 'aaa-product-page-filter' %}
Restricted Access (Plan Rules) are used to show/hide products, collections, and pages for specific members. View below image –
NOTE – If using Restricted Access (Plan Rules) in any membership plan then follow the below steps for the setup otherwise skip it.
Step 1. From Shopify Admin, go to the Online Store > Themes > Actions (Published Theme) > Edit Code (Published Theme).
Step 2. Open collection-template.liquid file under Sections and search for the keyword “for”. Some below-related line of code will appear.
{% for product in collection.products %}
Then, paste this code after the for loop –
 <!-- AAA: Memberships (collection products) -->

{% include 'aaa-collection-product-filter' %}

{% if aaa_hide_item == true %}

{% continue %}{% endif %}

<!-- end AAA code -->
NOTE: If for loop or some related code is not found in the file then there must be some snippets included and you can find that file under Snippets and paste the code there.
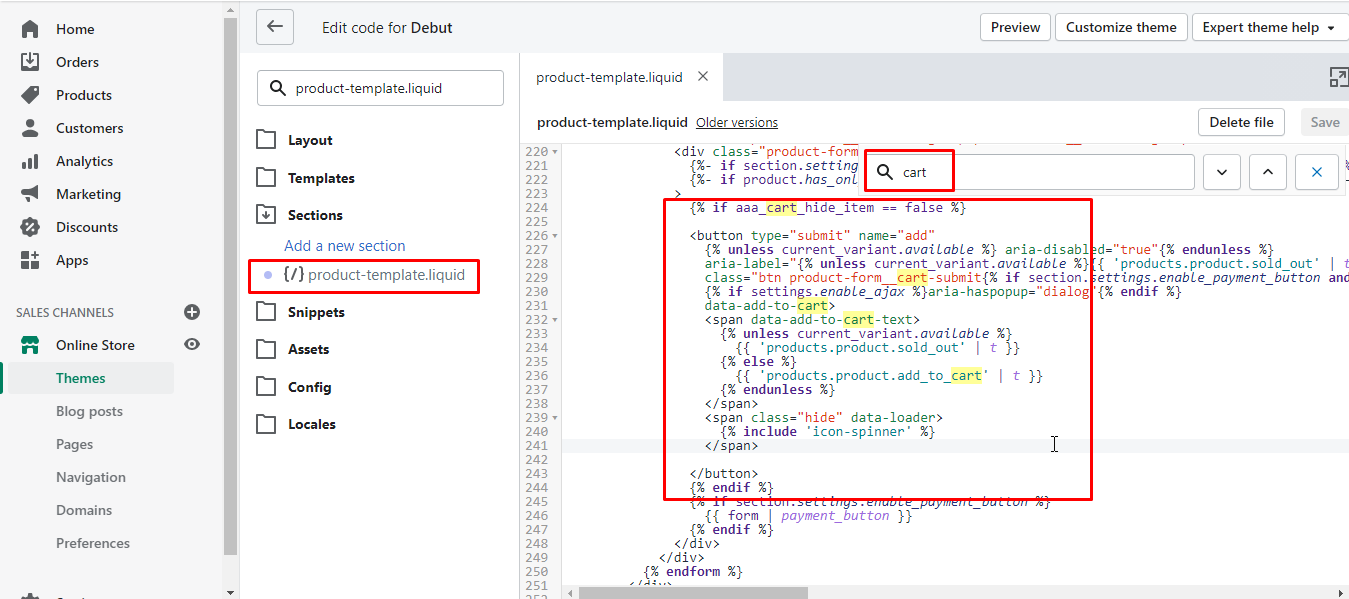
Step 3. Now, open file product-template.liquid file under Sections. Find the add to cart button by searching for the keyword “cart”.
NOTE: Some themes may have an add to cart button outside of this file. You can find it in files under Snippets like product-form.liquid.
3. a.) Copy and paste the below code at the beginning of the file and save
{% include 'aaa-plan_rule' %}
3.b.) Wrap the cart button with the below code
{% if aaa_cart_hide_item == false %}

Addtocartbutton here ...

{% endif %}
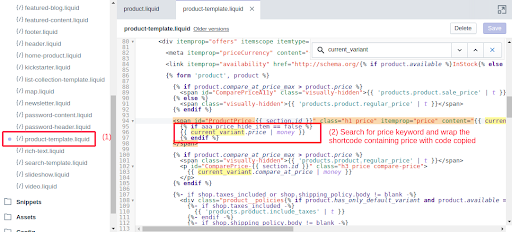
3.c.) In the same file, search for {{ current_variant.price | money }} or price keyword or some relevant code which is printing the value of the current price and wrap it with the below code.
NOTE: Some themes may have this code outside of the file. You can find it in files under Snippets like product-price.liquid.
{% if aaa_price_hide_item == false %}

price code stuff...

{% endif %}
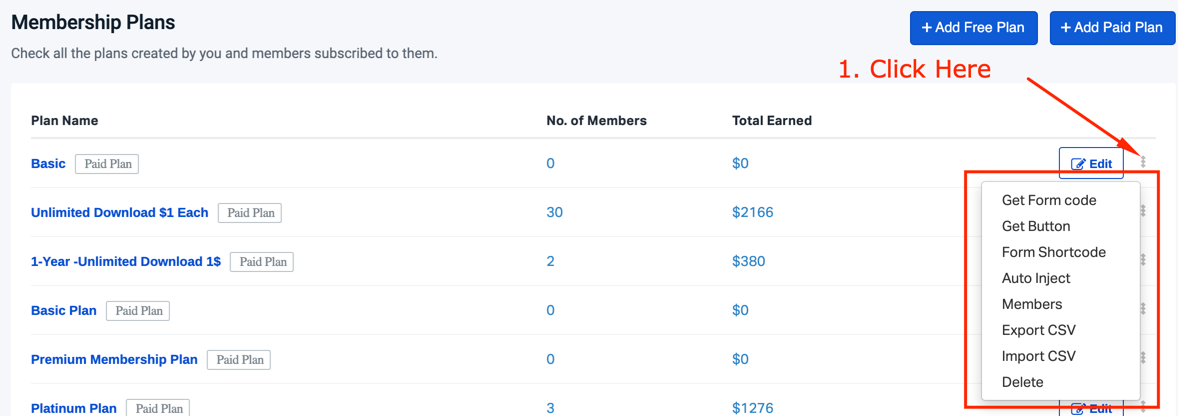
In the plan settings, three options are available-
- Get HTML code: This code will provide the HTML code of the form.
- Get Button: This code will provide the Button code. After clicking that button a popup with a form will appear.
- Auto injects code snippet on pages: This feature will inject the button code in any existing page you select.
 Paste the copied HTML or Button code in a page –